The RFC was started with a short
"We Love Food" post in January of 2008. Back then we were a gang of three and totally new to the Richmond local food scene. The Richmond Area Food Systems Council (RAFSC) of which we became members was not yet established. Erin bemoaned the lack of a Richmond Slow Food Chapter . (The nearest Slow Food chapter would be Charlottesville for a couple more years.) Tricycle Gardens was gaining momentum. The Mayors Food Policy Council where Erin would eventually serve was just pie in the sky, and the wonderful William Byrd House Market was the only RVA area farmers market outside of the old 17th st. market.
We felt a bit like pioneers when we launched this blog, and it definitely has taken us into new territory. Erin wrote for Edible Chesapeake as did Natalie. In the summer of 2008 we hosted our first RFC event, an outdoor film viewing and tomato tasting that brought out 75 people. Some wonderful people who we met for the first time that night quickly became our very close friends. We did the RVA mash up, (Please don't look this one up.) and were contacted by countless job seekers, farmers, producers, reporters, and interested readers who wanted to know where they might find that particular ingredient, farming job or help. We were awed by the response, and took the task of providing information seriously.
We all worked outdoors as gardeners and farmers. None of us had smart phones or day time access to computers. We would get off work and then get to work. Natalie's local food writing career took off and the former math major, and organic farm worker took off for graduate school in creative writing. Before long Erin and I were doing live (action) T.V. spots for 'Virginia This Morning' on channel six. I feel I can call it live action when one who has never been on live t.v. before must prepare five recipes and is told to chop apples with a chef's knife while maintaining a quick pace and sensible conversation!

Erin was there to help manage the very first year of the South of the James Market. The next year she worked with Saint Stephen's Church to create the St. Stephen's Market, and eventually their winter Market. We attended dinners and lectures. We read dozens of books and cookbooks, taught cooking classes, did demos at markets, worked with the fabulous new
Slow Food chapter ,
cooked food for Tricycle Gardens and traveled to farms, restaurants, wineries, markets, breweries, kitchens, and gardens to learn all we could about our local food system.
RFC gals Cat Hulbert, Shannon Smith, and Erin Wright
Year by year we educated ourselves, and hopefully provided some helpful information and needed inspiration to our readers. The last five years been a time of tremendous growth for small organic farms, sustainable meat producers, food co-ops, on-line local food ordering services, restaurants that serve some degree of local produce, cideries, breweries, wineries, and yes farmers markets. Five years ago there was one farmers market in town that spoke to the local/ sustainable food scene. Today there are fourteen area markets all filled with different vendors, and we have found it more than a little difficult to keep up! The latest addition... The Cary Street Farmer's Market has yet to make it onto to our list of
Local Farmer's Markets.
RFC gals Shannon, Casey Freeman, and Erin get a private tour of Twin Oaks Tofu
The local food/ sustainable food flag has been flown by the likes of Channel 12, and the Richmond Times Dispatch. Numbers of RVA Food Blogs, and local food blogs have appeared as well. In the mean time we have added a few wonderfully smart and fantastically interesting writers into the mix and all have found the act of keeping up with the scope of this blog daunting. My 'day job' as Horticulturist at Lewis Ginter Botanical Garden has grown and taken up a good deal more time-, and Erin.... well if you read this blog then you know she's had her hands overflowingly full with the work of starting up her own green grocery with a focus on fresh, local products and produce of course! Visit
Little House Green Grocery to learn more.
This post marks our 900th. It also marks a point in our lives where we have less time and there is so much more wonderful local food news with which to keep up. I guess we just want to fess up and say we are changing and clearly are no-longer able to maintain a highly current/ update local food and local food events blog.
We have had so much fun and met so many tremendously fantastic people-
and we know we will continue to do so. We still will be here to post
when we can find the time to share what inspires us. The blog and all
of it's 900 post will still be here if you need that
perfect roll or cookie recipe from Alma, or idea for a
Day Trip. You can still read our most visited post ever...
My Love Affair with October Beans.
We certainly don't feel that there's not more work to do, only we need
to figure out the best ways for each of us to get it done. Here's to new adventures, new friends and our loyal readers. We love you all even more than we love food-
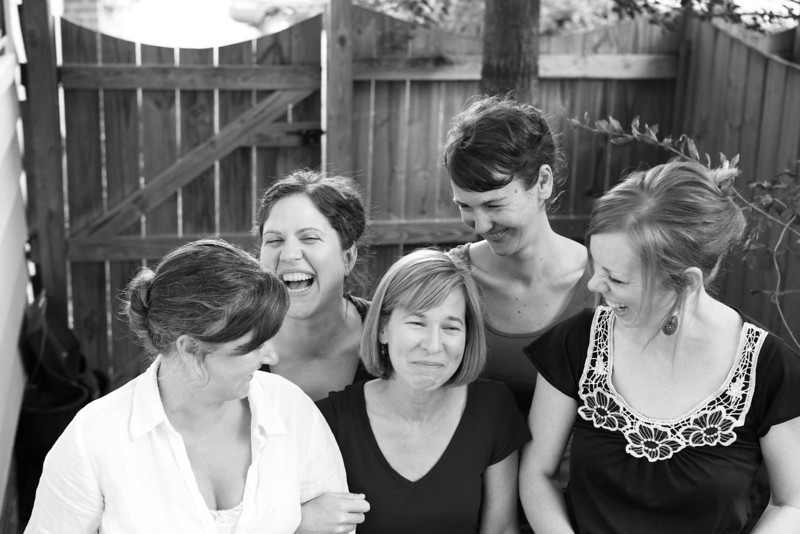
Cat, Casey, Erin, Shannon, and Rachel- at our first "photo shoot".